The Apple II line of computers uses two primary types of disk storage: 5.25 (5 1/4) inch floppy and 3.5 inch floppy (referred to as “800K floppy” for the remainder of the discussion). It is possible to hook a SCSI hard drive up to an Apple II via a special SCSI card, but good luck at that. They are rare and go for a premium. Besides, as described later, the Apple II (excluding the IIgs) is really a 5.25 inch floppy machine. Many programs can not be stored or run on a hard drive.
floppy gifThe 5.25 inch floppy is by far the most used storage medium on the Apple II and many programs will not work unless they are stored and running on an actual 5.25 inch floppy, although near the end of the Apple II market life many more programs were becoming available on 800K floppies.
An 800K floppy is quite a massive amount of storage area for Apple II programs. On average, most programs are around 40K-50K in size. Programs designed to run on the 16-bit IIgs are much larger and usually require an 800K floppy. An 800K floppy is virtually the same in appearance as a 1.4MB floppy except that it does not have the “bonus hole”, which identifies to the disk drive that the floppy is “high-density.” A floppy without the hole is identified as “double-density”. 800K drives cannot read or format high-density floppies. It is unwise to try to trick an 800K drive to do so because the physical storage medium is different and it will eventually lead to data loss or data corruption. 5.25 inch disks are fragile and can easily be damaged by the simple act of inserting one into a disk drive. Whenever possible, it is best to get programs running on an 800K floppy.
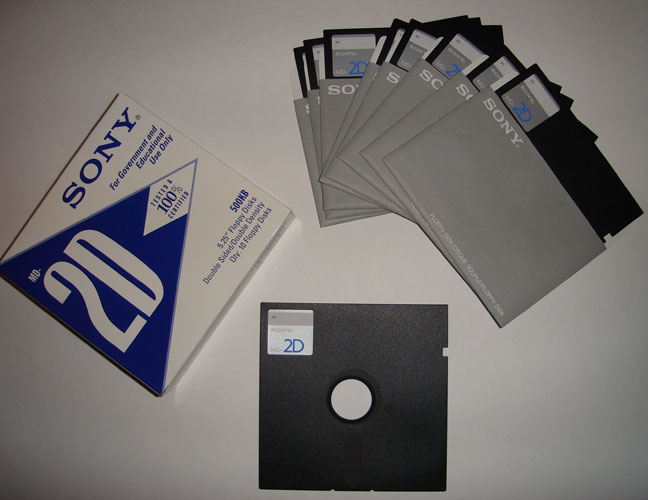
Currently, sources for 5.25 inch and 800K floppies are drying up. The last time I checked, Radio Shack no longer sold them. They removed them from the inventory around the end of 2001. It is still possible to find them used at thrift stores or buy them new online. I have picked up a pretty good stash of both 5.25 inch and 800K floppies from eBay for not much money. It is possible to use a 1.4MB drive on an Apple II but the cards for these are even more rare than SCSI cards.
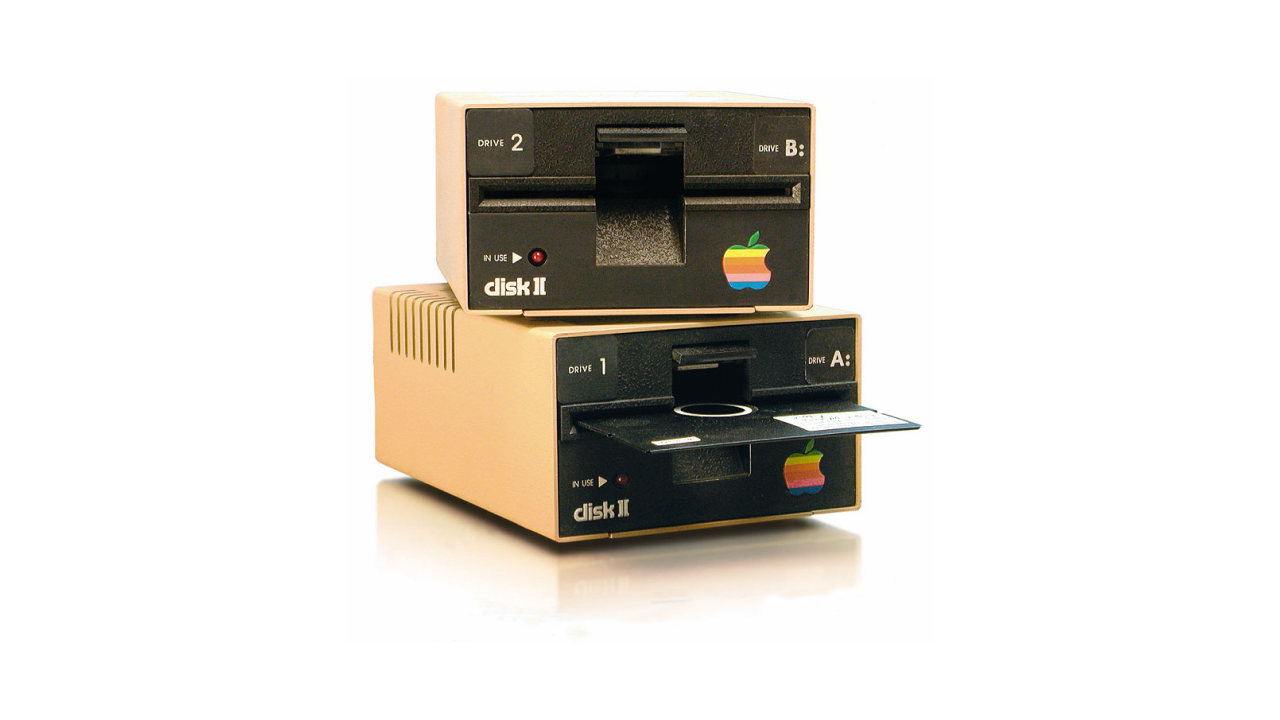
Of course to use these disks, you will need to get the disk drives. I would suggest using only Apple-branded drives, as they are high quality and very durable. In order to reduce stress on the 5.25 inch floppies, it is best to use two drives, daisy-chained to one another. This will keep you from having to swap out disks so often. One drive will run your master disk (DOS 3.3) and one will run your programs as it is often necessary to load DOS 3.3 before a game disk will boot. This is especially true for homemade game disks copied from original game disks, more on that later. Also, it is a good idea to pick up an 800K drive. For both of these drive types, you will need disk drive cards. They are not interoperable. Again, check thrift stores or eBay.
A recent trend in Apple II storage is third party flash drive cards. Innovative hobbyists are selling relatively inexpensive flash drive cards for the Apple II line of computers. This is an interesting development that should solve the issue of scarce SCSI cards for the Apple II.
Where can I get Apple II software?
You can try eBay and bid on the scarce disks available for sale at any given time. These disks are by now very old and their lifespan may be coming to an end. Disk lifespan varies due to the quality of the disk, the time it has spent in a disk drive, and the dissipation of the magnetic field. If you do happen to purchase some “real” period disks, try backing them up immediately. They are probably at the end of their lifespan. This might prove difficult as many are copy protected and cannot be copied without first cracking. This discussion does not discuss hacking your copy protected disks.
You can also forgo the whole native experience of owning and operating a real Apple II by emulating one through an emulation program using a ROM image. A ROM image basically contains the ROM machine code of a real Apple II. Most emulator makers will not give you this ROM image because legally, you should own an example of the device you are emulating. From your own Apple II, you can derive the ROM image. Most emulator makers will give you instructions on how to accomplish this. Along with the ROM image, you will need a disk image of the program you want to run in your emulator. Disk images are converted floppies, either 5.25 inch or 800K, that are in a format suitable for use in an emulator. There are multiple sources for disk images. This discussion centers primarily on how to convert these disk images back into their original format – a 5.25 inch or 800K floppy.
I am a collector as well as a software enthusiast. I enjoy using software on a real Apple II. Emulation doesn’t appeal to me. The games simply do not play like they do on a real vintage Apple II computer.
There are many online servers that hold massive amounts of Apple II programs. During its long market life, well over 10,000 programs were developed for the platform. The trick is to get these programs off the Internet and into a real Apple II. I have developed a way to do it but offer one word of warning. Most files are stored in disk image format, suitable for use with emulators. These programs are so old that most have turned into vaporware. Either the software company is out of business, or does not care to bother with defending the copyright on antiquated software, useless to anyone but the most dedicated Apple II collector. I will leave it up to you to decide if it is right to use these sources for your Apple II.
Apparently, it is less objectionable to all involved if these files are stored in disk image format, as they are unusable unless you have an emulator. Listed below are several online resource sites with tons of great Apple II programs, many of them stored as disk images. Later in the discussion, I will show you how to convert the disk images available on these and other sites into real 5.25 inch or 800K floppies and use them in a real Apple II. Basically, one has access to almost any program ever developed for the Apple II for almost no cost.
Essential Utilities
The first step to getting files off the Internet involves working with ShrinkIt files. ShrinkIt is the most common compression format for Apple II files. Transfering files between computers can be dangerous to your data. Compression utilities like ShrinkIt pack files for moving them between computers over a network. It is really no longer necessary in terms of size since Internet speed is so much greater today than in the past. Even on a 56K modem, most Apple II programs download individually in less than 10 seconds. The advantage of using ShrinkIt is that it can encapsulate multiple files. Since a great many files are in ShrinkIt format, you have to be able to un-ShrinkIt any compressed Apple II program before you can use it. Basically, when a file is compressed, a compression algorithm is employed to do away with duplicate characters or empty spaces. This compression makes the file much smaller and portable. A ShrinkIt file is similar to a Zipped file in that it can contain multiple files. ShrinkIt files are unusable in the compressed state. You may ask, what does this have to do with disk images and getting games for my Apple II? Good question. The answer is simple. In order to turn disk images into real Apple II floppies, you must use software formally stored on the Internet in ShrinkIt format.
ShrinkIt files do not self-extract. You must use the ShrinkIt utility as an extractor program on an actual Apple II computer in order to un-ShrinkIt a file. So, how do you un-ShrinkIt the ShrinkIt extractor to use on your Apple II as an un-ShrinkIt utility when the un-ShrinkIt program is in ShrinkIt format? Kind of sounds like a Catch-22. That is where a nifty little program called BSCit (pronounced “biscuit”) comes in handy. BSCit is self-installing. You download BSCit, transfer it to an 800K floppy and run it on an Apple II. Once BSCit self-extracts on your Apple II, it becomes an Apple II executable program. The next step is to find a version of ShrinkIt stored on the Internet in .bsc (binscii encoded) format. I have provided these programs at the end of this section. After downloading the .bsc ShrinkIt file, you can put it on an 800K floppy, transfer it to your Apple II, and convert it from binscii format to a usable Apple II format with BSCit. Wait a minute, that all sounds so simple. Well, I have skipped quite a few steps. Read the entire discussion before you attempt to do any of this. Questions you may have concerning any step in the process may be answered before you know they exist.
BSCit basically turns an Apple II file into a plain text file in binscii format. You can find many great Apple II programs stored on the Internet in binscii format. So it is to your advantage to have both utilities available to you at any given time. BSCit (or binscii encoded) files usually end in “.bsc”. They can also end in “.bxy” to show that they are binscii’d ShrinkIt files. ShrinkIt files are identified by a “.shk” ending on their names or, for shrunk disks, “.sdk”. ShrinkIt has its limits for packing files for sending over a modem. Files can lose their ShrinkIt filetype during transit and you cannot simply paste a ShrinkIt file into an email. BSCit can be used to turn ShrinkIt files into plain text suitable for submitting safely via email or over a modem connection. Often times, ShrinkIt files, BSCit files, or disk images are compressed using modern compression programs like Stuffit Expander. It really depends on the source you choose to download your programs, as there are many compression options. Fortunately, you can decompress these files using the default utility installed on your modern Macintosh. After decompression, you may find that now you have another compressed ShrinkIt file that you must decompress on your Apple II or a BSCit file that you must convert on your Apple II or maybe a combination of both. Sounds like fun to me!
Copy II Plus 7.1
Copy II Plus from Central Point Software, Inc. is a very handy utility. This program will allow you to convert disk images back into real 5.25 inch floppies. For some reason, unknown to me, this is the only version of this line of software that supports this process. Resist the temptation to use a later version of Copy II Plus because you will find that they simply will not work. Linked below is a download for Copy II Plus 7.1 in .sdk format. In order to use the file, you must be able to un-ShrinkIt on an Apple II. That is why both BSCit and ShrinkIt are needed. The above linked ShrinkIt program is binscii’d. It will install on an Apple II by using BSCit. As stated earlier, BSCit will install itself. Notice the pattern that has developed? Get a copy of BSCit and install it on your Apple II. Use BSCit to install ShrinkIt. Use ShrinkIt to decompress Copy II Plus 7.1. Finally, use Copy II Plus 7.1 to turn disk images into 5.25 inch floppies suitable for use on your real Apple II. In order for you to accomplish these steps, you must have the right equipment, or maybe you can develop your own method. I have come across other ways to get programs once stored on the Internet into an Apple II but none have seemed to work for me. In the next section, I discuss the equipment that has worked for me. The Disk Image section explains further how to use Copy II Plus to convert a disk image into a real floppy.
Equipment Needed
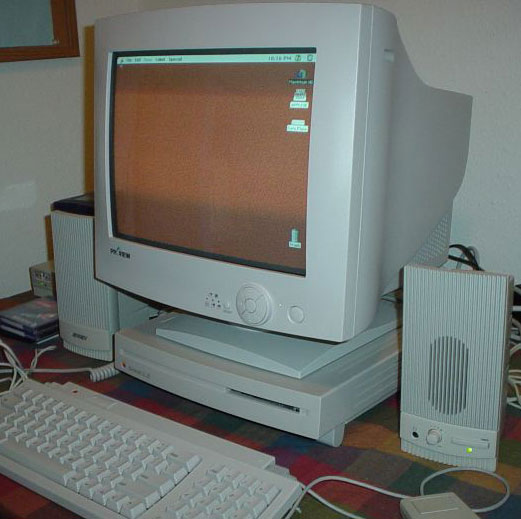
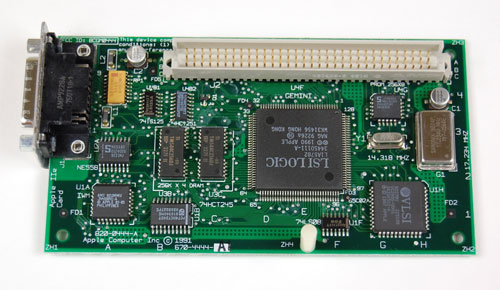
This is an Apple site. I use Apple computers exclusively. There may be methods available for Window machines but I would have no idea about such things. Furthermore, I have had difficulty trying to use a Macintosh running OS X to accomplish the transfer. OS X has rather flimsy floppy support. My third party, external 1.4 floppy drive does not supports 800K floppies. It will format in ProDOS but sometimes it gives me errors when I try to copy Apple II files to it. This has made it necessary to move Apple II files on Mac OS 1.4MB formatted floppies. But in order to use Copy II Plus, you must use an 800K floppy. My solution was to buy a Macintosh LC III computer and an Apple IIe Card. I really only need an excuse to buy a Macintosh, so when this need developed, I purchased one on eBay. Any model of LC Macintosh will work (even a Color Classic). The LC III, like the other LCs, has one expansion slot, Processor Direct Slot or PDS. In the early 90s, Apple made an Apple IIe PDS card that basically turns your Macintosh into a functioning Apple IIe. My LC III has an 80MB hard drive that is partitioned with one 10MB partition formatted in ProDOS and the other 70MB partition formatted in Mac OS 7.5. The 10MB ProDOS partition functions like a real Profile hard drive and is set as the startup drive for the virtual Apple IIe. The IIe card can be purchased for less than $10 on eBay. The Apple IIe Card is really a nice setup to have if you are an Apple II fan.
All my downloaded Apple II files are copied to a 1.4 floppy and moved to the LC III. I don’t use my old LC to surf the Internet so that is why I have to transfer the files on disk. If you do have one configured for the Internet, you can download the files directly from their source, ready for conversion without having to transfer them by floppy from your modern Mac.
An 800K floppy, suitable for use with Copy II Plus, can be formatted in ProDOS by a System 7 Macintosh by erasing the disk and choosing ProDOS format from the dialog menu. The older Macintosh “Super Drive” installed on LC Macs can format and read 800K or 1.4MB floppies in Mac OS format, MSDOS format, or ProDOS format provided the proper extensions are available in the System folder. The ProDOS File System extension must be installed before Mac OS 7 (7.5 on my LC III) can read or format a ProDOS disk. This extension is provided with the IIe card install software. Macintosh computers cannot format or read a ProDOS partition or floppy disk without this extension. It is possible to use 1.4 floppies as IIe disks but this will cause you trouble later, especially if you wish to move something on the disk to a real Apple II. Besides, Copy II Plus will not work with 1.4 floppies.
Once you have a working Apple IIe Card on an LC Macintosh, follow the instructions described in the BSCit Instructions text file available for you to download in the above section. Follow it to the letter. It may take some time for you to get it to work, but believe me, it does. After BSCit is installed and running on the Apple IIe Card, use it to get ShrinkIt working. Once you have ShrinkIt working, get Copy II Plus working. At this point, you are almost ready to convert disk images. Before you can convert a disk image, you must perform a few more steps on the disk image file using software on the Macintosh side. The next section explains how to use ImageConverter and ResEdit to prepare a disk image file before Copy II Plus can convert the image into a real 5.25 inch floppy.
Converting Disk Images
An Apple II disk images can be best described as a self-contained emulation of a 5.25 inch or 800K floppy. When using a disk image with an emulator, the emulator treats the disk for all intents and purposes like a real floppy. For all the emulator knows, the image is a real floppy. A sizeable Internet database of disk images exists for use with Apple II emulators.
Users throw away their old computers when they purchase the latest and greatest model on the market. The computer industry is built around planned obsolescence. Over time and given successive generations of hardware and operating systems, newer machines lose the backward compatibility to run antiquated software. Without Apple II emulators and disk images, most people would not have access to these older programs. These disk images, kept in storage on the Internet primarily for emulation purposes, can be converted back into real disks, ready to run in a real Apple II.
Once you have a working version of Copy II Plus running on a real Apple II or Apple IIe Card, you can convert disk images back into real floppies. As previously mentioned, I accomplished this feat by using an Apple IIe Card installed on a Macintosh LC III. In order for Copy II Plus to work its magic, you must do some more work on the disk image file and then copy it to a ProDOS 800K floppy in your LC disk drive. Another quick word of warning is warranted before I go over the procedure. Mac OS 7.5 or below, installed on your LC, does not like ProDOS files. It is best to not even store them in the Mac OS partition if you can avoid it. Classic Mac OS uses a resource fork, which is attached to files or encapsulated apps. The resource fork aids the system in determining file type and other attributes. The simple act of opening a file can cause it to be corrupted with a resource fork, corrupted in the sense that a resource fork in this case will ruin your Apple II disk image. It is wise to do nothing with your Apple II programs short of coping your files from a floppy to the desktop or moving them from one folder to another while you have them sitting in a Mac OS partition.
ResEdit is a program from Apple Computer, Inc. that lets you manipulate many of the hidden attributes attached to any Mac file. You will need to use ResEdit to change the Type and Creator of the disk image in order for ImageConverter to recognize it. To do this, start up ResEdit and select “Get File/Folder Info” under “File” on the Apple Menu. If you choose to open the file instead of using Get Info, ResEdit will stick a resource fork on it. So don’t do that. Disk images need to have the right Type and Creator to be recognized by ImageConverter (although changing just the Type might work as well, but it is good to change both just to be thorough). “.po” disk images must have ‘DISK’ Type and Creator while “.do” disk images must have ‘DSK5’ Type and Creator. Most of your disks will be “.do”.
ImageConverter
This link will take you to a page that will allow you to download the program. Thanks go to the author. Please send him a little something if you feel that this program is worth it.
Now your disk image is ready for ImageConverter. ImageConverter is available at the link listed below. It is “donationware” so give if you feel the need. Open the ImageConverter program and choose the disk image file you wish to convert from the Apple menu. Draging and dropping a disk image onto the ImageConverter icon like the author suggests has never really worked for me. Choose “Copy II+”. After ImageConverter does its magic, there will now be a file called “xxx.img” (xxx is the name of the original image) sitting on your desktop and it should have a plain document icon. This is your Copy II Plus image. You may need to change the name of the file into a suitable ProDOS name. See the ProDOS guide on VAW for further information. Too many characters or characters not recognized for a ProDOS file name will cause an error when you attempt to drag the image into a ProDOS formatted 800K floppy. Next, drag the “.img” file onto an 800K ProDOS disk.
You can now bring this file to a real Apple IIe and run Copy II Plus. You must type “BYE” at the command prompt if you are using ProDOS with Copy II Plus. This will allow you to select the SYS file. As I have previously suggested, you can use an Apple IIe Card in an LC Macintosh to run Copy II Plus. If you are using an Apple IIe Card, you must first eject the 800K floppy and insert it again. For some reason, if you do not do this step, the Apple IIe Card will not recognize the disk. The Apple IIe Card has an easy to use slot configuration setup. Be sure you know which drive you are using for the 800K floppy. It is possible to erase your Apple IIe partition on your hard drive, so be careful. You will also need a formatted 5.25 inch floppy ready to use. The Apple IIe Card has a connection cable (a two-pronged cable, one prong for a joystick, the other for a disk drive) that will allow you to connect a 5.25 inch drive. I usually format the 5.25 inch disks with DOS 3.3 before I attempt to copy an image onto them. See more about formatting a disk on the DOS 3.3 and ProDOS Guide page. If this doesn’t work, try formatting the disk in ProDOS.
With everything ready, run Copy II Plus. This is the menu path: “copy->disk->3.5->5.25”. Choose the “xxx.img” and the destination disk (be careful not to overwrite your hard drive if you are using an Apple IIe card). After it finishes, you should have a working disk.
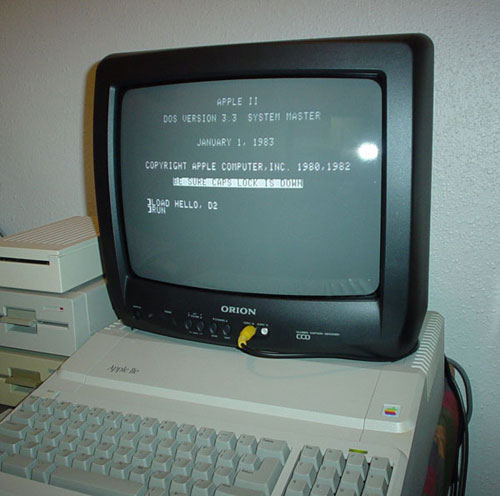
If you are unfamiliar with DOS 3.3, you may think the conversion has failed when you attempt to boot the disk and you get garbage on your screen. More than likely, you must boot DOS 3.3 before the disk will play. If you have two disk drives, boot DOS 3.3 in the drive 1 (D1) and insert the newly converted disk in drive 2 (D2). Type in these DOS 3.3 commands:
LOAD HELLO, D2
Push Return, then type:
RUN
Push Return
The greeting program is usually titled “HELLO.” This is not required but it seems to be the generally accepted convention. This will load the Integer BASIC “HELLO” program, which will boot the disk after you type the RUN command. If this doesn’t work, try to view the contents of the disk (ShrinkIt has a great disk content viewer) to determine if there is an alternative boot program. You can also use the DOS 3.3 CATALOG command. If you can’t determine one, try them all. If there are no BASIC programs (file type “I” in DOS 3.3) on the disk, try to use the BLOAD/BRUN commands. What do you got to lose at this point? You might as well be thorough.
If working with one disk drive, you will have to swap out the DOS 3.3 master disk with your new disk and type:
LOAD HELLO, D1
Push Return, then type:
RUN
Push Return
How do you get your hands on a DOS 3.3 master disk you ask? The same way you just converted the disk image. It is available in disk image format in many places on the Internet. Try the above Apple II Links section. It would be a good idea to convert a DOS 3.3 before you try to convert DOS 3.3 software.
If the disk is ProDOS it will be self-booting, but you may have to use the CAT command to view the contents of the disk and then BRUN or RUN to start the program. The disk may use some other proprietary format designed to prevent cracking and as such should be self-booting. In that case, when you try to view the contents, you won’t get anything listed because the disk contents are intentionally hidden from prying eyes.
I hope this discussion has been helpful. Please feel free to email me if you have any questions. Enjoy all the software you will now be able to run on a real Apple II.